ePipe VPN and Security Family Secure Remote Access
(SRA)
Configuring a Windows 2000 VPN Client
Configuring Windows 2000 to establish a VPN tunnel (Point to Point Tunneling
Protocol) connection to an ePipe is a straight forward process.
Initial Configuration
The following procedure for configuring Windows 2000 assumes that a dial
up connection to an ISP has already been configured on the client computer.
Follow the steps below to configure a PPTP connection:
- Go to Start -> Settings ->Network and Dial-up Connections
then select the Make New Connection icon. (This opens the Network
Connection Wizard). Click Next.
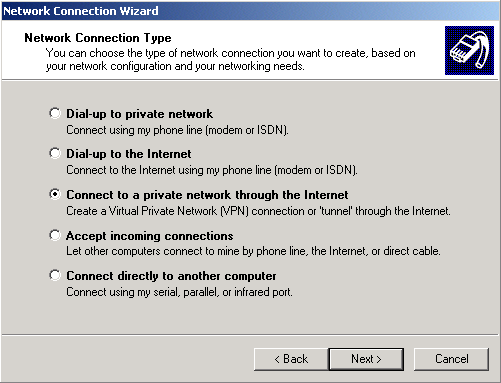
- The Network Connection type dialog box opens as shown below. Select Connect
to a private network through the Internet. Click Next .
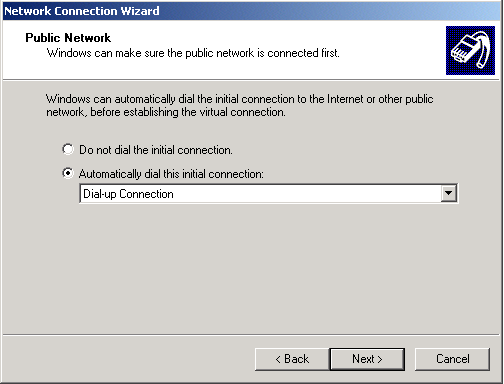
- The Public Network Dialog box opens. Windows can automatically dial the
initial connection to the Internet before establishing the virtual connection.
Choose whether you would like this to occur by selecting one of the options,
as shown below, then click Next.
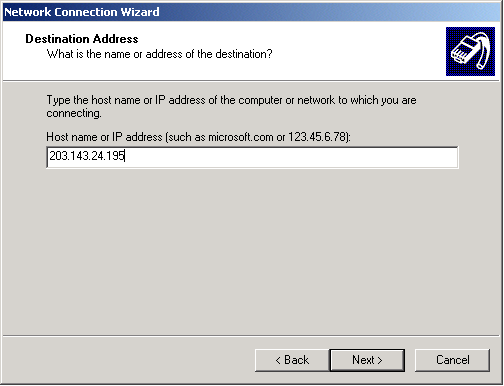
- The Destination Address Dialog Box opens. In this box, enter the Fixed
IP address of the Internet connection from the ePipe. If you do not know
this, ask your network administrator or your ISP. Click Next.
- The Connection Availability Dialog Box opens. Select either all users
or single user as appropriate. Click Next.
- Depending on how your network and Internet connections are set up, an
Internet Connection Sharing Dialog box may appear. This is unrelated
to the Secure Remote Access VPN but gives the option of sharing the connection
with any other machines on a Network. If you wish to share the Internet
connection, check Enable Connection Sharing for this connection.
This may impact on your bandwidth across the SRA VPN tunnel. Click Next.
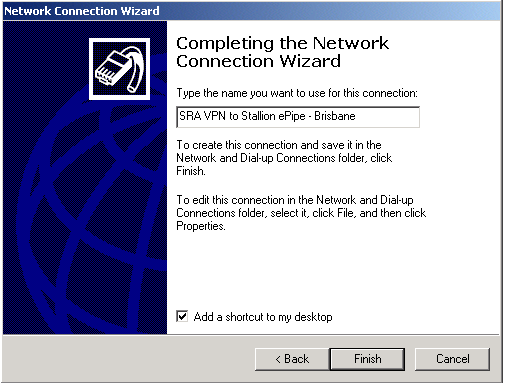
- The Completing the Network Connection Wizard Dialog box opens.
This dialogue allows the user to provide a name for the connection, the
default being Virtual Private Connection. To create a shortcut for the userís
desktop, check the box at the bottom left of the screen. Click Finish
to complete the wizard.
Configuring the Network Connection
Initially, the settings for your connection to the Internet need to be checked
to ensure the PPTP VPN connection to the ePipe behaves as expected. Follow
the steps below:
- Click on Start -> Settings -> Network and Dial-up
Connections then right click the recently configured PPTP connection
and select Properties.
- Click the Security tag then select Advanced (custom settings)
and click on the Settings button to the right of the screen.
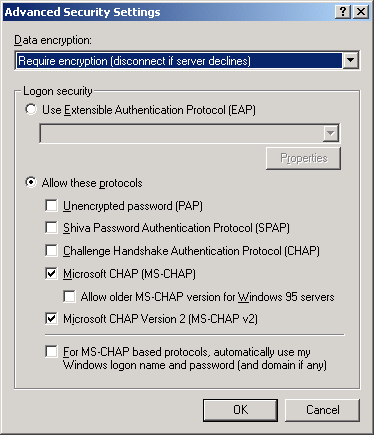
- Click on the radio button next to Allow these protocols and ensure
that MS-CHAP and MS-CHAP v2 are selected by ticking the box next to them.
These are required to encrypt data over the SRA VPN. ePipe also supports
PAP and CHAP for unencrypted data. When the above steps have been completed,
click OK.
- Next click on the Networking tag. Verify that Internet Protocol
(TCP/IP) is present and that the checkbox is checked. Select Internet
Protocol (TCP/IP) and click Properties. Ask your Network Administrator
for the DNS Serverís IP Address for the network you are connecting to and
enter the address where asked on the screen.
- Click Advanced under the DNS addresses on this page and then click the
WINS tag. Ask your Network Administrator for the WINS Server IP Address
for the network you are connecting to and enter it on this screen (assuming
you are using a WINS server).
DNS is an acronym for Domain Name System. DNS converts IP host names to IP
addresses. WINS (Windows Internet Name Service) converts Windows computer
names (NetBIOS names) to IP addresses. WINS or manual NetBIOS name resolution
(using LMHOSTS) is required for Windows network logon and browsing to function
correctly.
Starting the PPTP Tunnel
To start your PPTP tunnel connection and connect to an ePipe, simply click
the previously configured network connection (icon) under Settings
-> Network and Dial-up Connections. Depending on the way in which
the VPN was setup, you may need to connect to your ISP before starting the
tunnel.

about ePipe | products
| solutions | support
| information center | contact
us
Copyright © 2002 ePipe Pty. Ltd. All rights reserved.


![]()